hms_room_kit 1.1.1  hms_room_kit: ^1.1.1 copied to clipboard
100ms Room Kit provides simple & easy to use UI components to build Live Streaming & Video Conferencing experiences in your apps.
100ms Room Kit 🎉 #

![]()


A powerful prebuilt UI library for audio/video conferencing, live streaming, and one-to-one calls. This package provides developers with a comprehensive set of tools and components to quickly integrate high-quality audio and video communication features into their Flutter applications.
| Package | Version |
|---|---|
| hms_room_kit | |
| hmssdk_flutter |  |
🧱 The Prebuilt QuickStart Guide is available here.
📖 Read the Complete Documentation here: https://www.100ms.live/docs/flutter/v2/guides/quickstart
📲 Download the Sample iOS app here: https://testflight.apple.com/join/Uhzebmut
🤖 Download the Sample Android app here: https://appdistribution.firebase.dev/i/b623e5310929ab70
100ms Flutter apps are also released on the App Stores, you can download them here:
📲 iOS app on Apple App Store: https://apps.apple.com/app/100ms-live/id1576541989
🤖 Android app on Google Play Store: https://play.google.com/store/apps/details?id=live.hms.flutter
🚂 Setup Guide #
-
Sign up on https://dashboard.100ms.live/register & visit the Developer tab to access your credentials.
-
Get familiarized with Tokens & Security here
-
Complete the steps in Auth Token Quick Start Guide
-
Get the HMSSDK via pub-web.flutter-io.cn. Add the
hms_room_kitto your pubspec.yaml.
flutter pub add hms_room_kit
- Import the
hms_room_kitpackage wherever you wish to use it:
import 'package:hms_room_kit/hmssdk_uikit.dart';
- Add the
HMSPrebuiltwidget in your widget tree to use the prebuilt ui with correctroomCodeand desired prebuilt options.
HMSPrebuilt(
    roomCode: "xvm-wxwo-gbl",
    hmsConfig: HMSPrebuiltOptions(userName: "John Appleseed"),
);
Overview #
This guide will walk you through simple instructions to create a video conferencing app using 100ms Prebuilt and and test it using an emulator or your mobile phone. 100ms prebuilt is completely customizable from 100ms dashboard. Following images portray what you get with 100ms prebuilt
Create a sample app #
This section contains instructions to create a simple Flutter video conferencing app. We will help you with instructions to understand the project setup and complete code sample to implement this quickly.
Prerequisites #
To complete this implementation for the Android platform, you must have the following:
- A 100ms account if you don't have one already.
- Flutter
3.3.0or higher - Dart
2.12.0or above - Use VS code, Android Studio, or any other IDE that supports Flutter. For more information on setting up an IDE, check Flutter's official guide.
Create a Flutter app #
Once you have the prerequisites, follow the steps below to create a Flutter app. This guide will use VS code, but you can use any IDE that supports Flutter.
-
Create a Flutter app using the terminal; you can get the Flutter SDK and use the below command:
flutter create my_app -
Once the app is created, open it in VS code.
Add 100ms room kit to your project #
Once you have created a Flutter app, you must add the hms_room_kit package to your project.
In project's pubspec.yaml file, under dependencies section add the following:
hms_room_kit:
- Run
flutter pub getto download these dependencies to your app.
Application Setup #
For Android
Please follow the below instructions to test the app for the Android Platform:
- Add minimum SDK version (
minSdkVersion 21) inandroid/app/build.gradlefile (insidedefaultConfig).
...
defaultConfig {
    ...
    minSdkVersion 21
    ...
}
...
- To add PIP support in your app manifest files, add:
<activity
    ....
    android:supportsPictureInPicture="true"
    android:configChanges="screenSize|smallestScreenSize|screenLayout|orientation"
    ... />
- For Auto Enter PIP support(below android 12) in your
MainActivity.ktfile add:
override fun onUserLeaveHint() {
    super.onUserLeaveHint()
    // This should only work for android version above 8 since PIP is only supported after
    // android 8 and will not be called after android 12 since it automatically gets handled by android.
    if (Build.VERSION.SDK_INT >= Build.VERSION_CODES.O && Build.VERSION.SDK_INT < Build.VERSION_CODES.S) {
        HMSPipAction.autoEnterPipMode(this)
    }
}
- For screenshare in your
MainActivity.ktadd:
override fun onActivityResult(requestCode: Int, resultCode: Int, data: Intent?) {
super.onActivityResult(requestCode, resultCode, data)

    if (requestCode == Constants.SCREEN_SHARE_INTENT_REQUEST_CODE && resultCode == Activity.RESULT_OK) {
        data?.action = Constants.HMSSDK_RECEIVER
        activity.sendBroadcast(data?.putExtra(Constants.METHOD_CALL, Constants.SCREEN_SHARE_REQUEST))
    }
}
- Add the
FOREGROUND_SERVICEpermission inAndroidManifest.xml:
<uses-permission android:name="android.permission.FOREGROUND_SERVICE" />
For iOS
Please follow the below instructions to test the app for iOS Platform
- Add the target platform version as (
platform :ios, '12.0') inios/Podfile
platform :ios, '12.0'
-
Allow camera, recording audio and internet permissions by adding the below snippet to the
ios/Runner/info.plistfile.<key>NSMicrophoneUsageDescription</key> <string>{YourAppName} wants to use your microphone</string> <key>NSCameraUsageDescription</key> <string>{YourAppName} wants to use your camera</string> <key>NSLocalNetworkUsageDescription</key> <string>{YourAppName} App wants to use your local network</string> <key>NSBluetoothAlwaysUsageDescription</key> <string>{YourAppName} needs access to bluetooth to connect to nearby devices.</string> -
Add the below snippet to the
ios/Podfilein post_install section:target.build_configurations.each do |config| config.build_settings['GCC_PREPROCESSOR_DEFINITIONS'] ||= [ '$(inherited)', ## dart: PermissionGroup.camera 'PERMISSION_CAMERA=1', ## dart: PermissionGroup.microphone 'PERMISSION_MICROPHONE=1', ## dart: PermissionGroup.bluetooth 'PERMISSION_BLUETOOTH=1', ] end -
To add PIP support in your iOS app:
- Minimum Requirements:
- Minimum iOS version required to support PiP is iOS 15
- Minimum
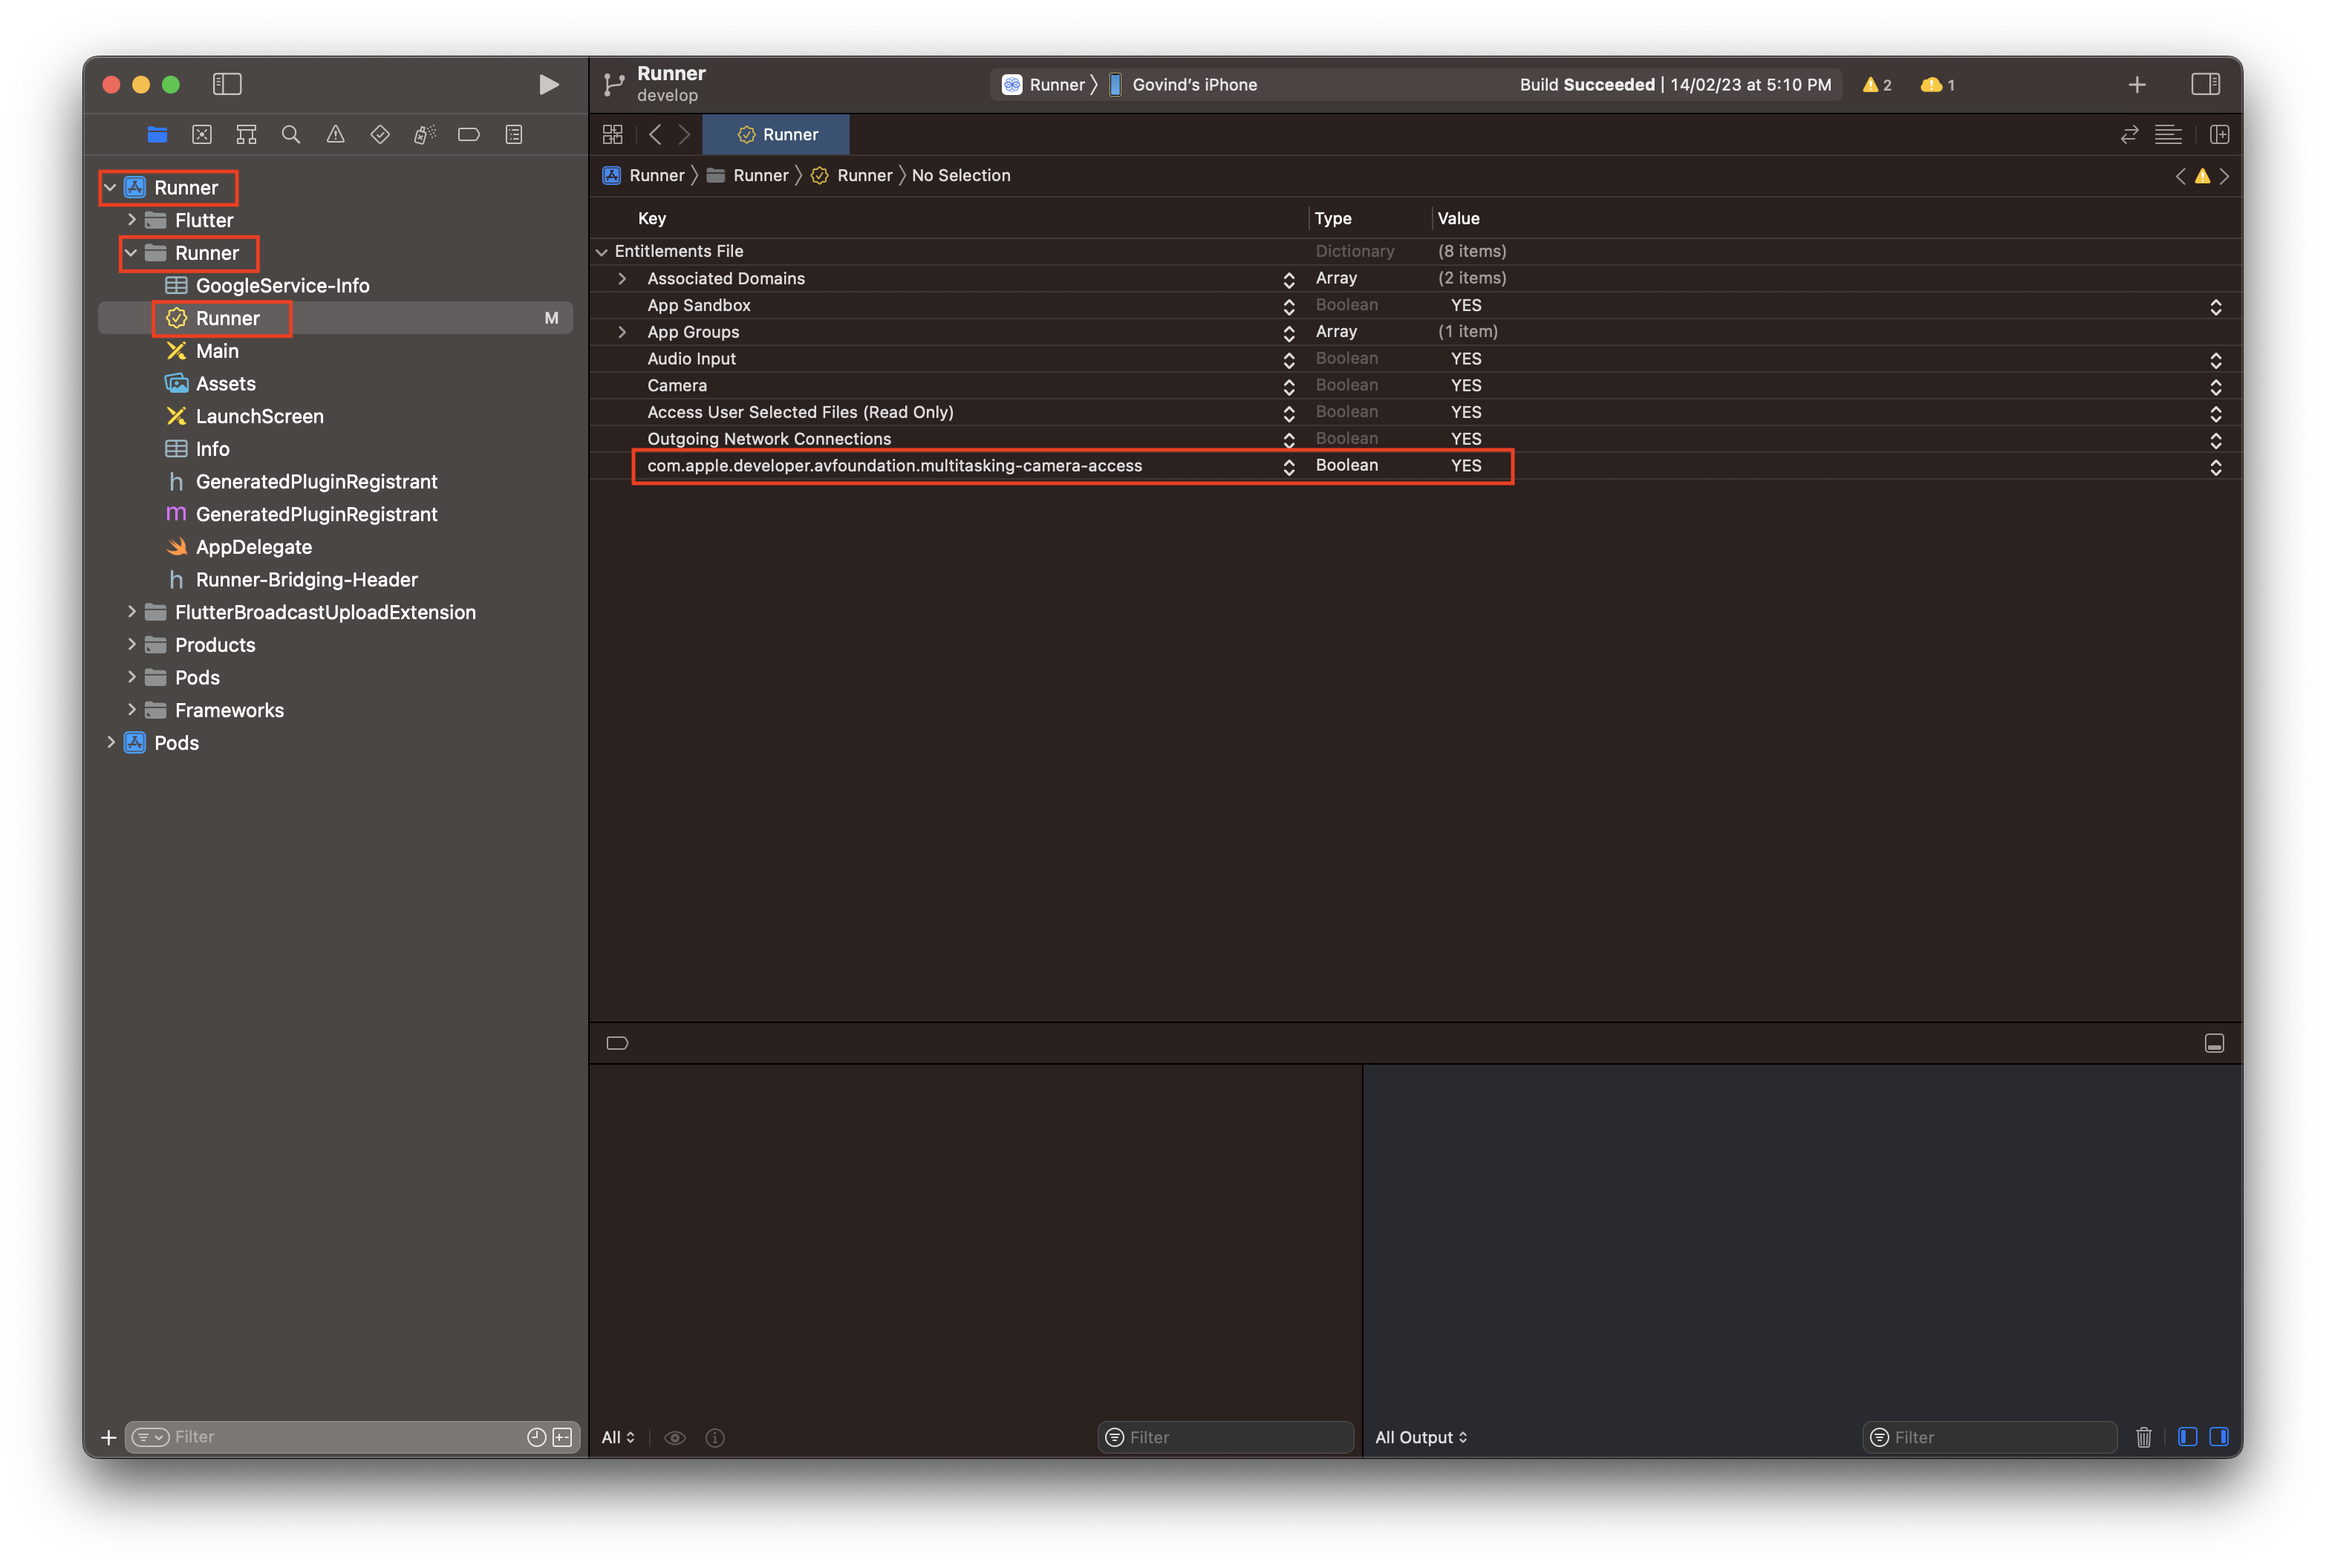
hmssdk_flutterSDK version required is 1.3.0 - Your app should have [com.apple.developer.avfoundation.multitasking-camera-access)(https://developer.apple.com/documentation/bundleresources/entitlements/com_apple_developer_avfoundation_multitasking-camera-access) Entitlement to use PiP Mode.
Your app needs to run on iOS 13.5 or later to use the entitlement. Without the entitlement, the system disables the camera access for your app. When your app enters PIP mode, it needs this entitlement to continue using the camera.
After you receive permission from Apple, add the Entitlement to your app by opening the Entitlements file in Xcode. Add the key and set the corresponding value to YES.
-
To add screen share support in iOS app, checkout the docs here
-
Pass the
iOSScreenshareConfiginHMSPrebuiltOptionsparameter ofHMSPrebuiltwidget to enable screen share in your app.
// Pass the correct App Group & Preferred Extension parameters in HMSIOSScreenshareConfig class.
HMSPrebuilt(
    roomCode: meetingLinkController.text.trim(),
    options: HMSPrebuiltOptions(
        iOSScreenshareConfig:  HMSIOSScreenshareConfig(
    appGroup: "appGroup", // App Group value linked to your Apple Developer Account
    preferredExtension: "preferredExtension" // Name of the Broadcast Upload Extension Target created in Xcode
)));
Add the 100ms Room Kit to your App #
We will be adding a join button to the app, on the button click we will route the user to the 100ms room kit. To do this, follow the steps below:
- Add the below code for
Joinbutton inlib/main.dartfile:
Scaffold(
    body: Center(
        child: ElevatedButton(
            style: ButtonStyle(
                shape: MaterialStateProperty.all<RoundedRectangleBorder>(
                    RoundedRectangleBorder(
            borderRadius: BorderRadius.circular(8.0),
            ))),
            onPressed: () async => {
            ///Here will route the user to the 100ms room kit
            },
            child: const Padding(
            padding: EdgeInsets.symmetric(vertical: 20, horizontal: 20),
                child: Text(
                    'Join',
                    style: TextStyle(fontSize: 20),
                ),
            ),
        ),
    ),
);
- Update the code in the
onPressedmethod of theJoinbutton by following code:
onPressed: () async => {
        await Navigator.push(
            context,
            MaterialPageRoute(
            builder: (context) => const HMSPrebuilt(roomCode: "xvm-wxwo-gbl")
        ),
    ),
}
That's it. You can now use the amazing Prebuilt UI in your application.
🧱 The Prebuilt QuickStart Guide is available here.
📖 Do refer the Complete Documentation Guide available here.
🏃♀️ Checkout the Example app implementation available here.
🚀 We have added explanations & recommended usage guide for different features, UI Layouts, Data Store, etc in Example app ReadMe.
100ms Flutter apps are released on the App Stores, you can download them here:
📲 iOS app on Apple App Store: https://apps.apple.com/app/100ms-live/id1576541989
🤖 Android app on Google Play Store: https://play.google.com/store/apps/details?id=live.hms.flutter
Metadata
Publisher
Metadata
100ms Room Kit provides simple & easy to use UI components to build Live Streaming & Video Conferencing experiences in your apps.
Homepage
Repository (GitHub)
View/report issues
Documentation
License
![]() MIT (LICENSE)
MIT (LICENSE)
Dependencies
badges, collection, dots_indicator, draggable_widget, dropdown_button2, flutter, flutter_linkify, flutter_svg, focus_detector_v2, google_fonts, hmssdk_flutter, intl, lottie, path_provider, permission_handler, provider, share_plus, shared_preferences, tuple, url_launcher