auto_route 6.0.0-rc-6  auto_route: ^6.0.0-rc-6 copied to clipboard
AutoRoute is a declarative routing solution, where everything needed for navigation is automatically generated for you.
![]()


- Introduction
- Generated routes
- Navigation
- Declarative Navigation
- Working with Paths
- Route guards
- Wrapping routes
- Navigation Observers
- Customization
- Others
- Examples
Idea Tools [New] #
- AutoRoute-Helper (Android Studio)
Note if you can't find the plugin on the marketplace yet you can Download it here install manually
Migration guides #
Introduction #
What is AutoRoute?
It’s a Flutter navigation package, it allows for strongly-typed arguments passing, effortless deep-linking and it uses code generation to simplify routes setup, with that being said it requires a minimal amount of code to generate everything needed for navigation inside of your App.
Why AutoRoute?
If your App requires deep-linking or guarded routes or just a clean routing setup you'll need to use named/generated routes and you’ll end up writing a lot of boilerplate code for mediator argument classes, checking for required arguments, extracting arguments and a bunch of other stuff. AutoRoute does all that for you and much more.
Installation #
dependencies:
 auto_route: [latest-version]

dev_dependencies:
 auto_route_generator: [latest-version]
 build_runner:
Setup And Usage #
1- Create a router class and annotate it with @AutoRouterConfig then extend "$YourClassName".
2- override the routes getter and start adding your routes.
@AutoRouterConfig()
class AppRouter extends $AppRouter {

 @override
 final List<AutoRoute> routes = [
  /// routes go here
  ]
}
Using part builder #
To generate a part-of file simply add a Part Directive to your AppRouter and extend the generated private router.
Note deferredLoading functionality does not work with part-file setup
part 'app_router.gr.dart';

@AutoRouterConfig()
class AppRouter extends _$AppRouter {

  @override
  final List<AutoRoute> routes = [
   /// routes go here
   ]
 }
Generating Routable pages #
Routable pages are just simple everyday widgets annotated with @RoutePage() which allows them to be constructed by the router.
@RoutePage()
class HomeScreen§ extends StatefulWidget {}
Now simply run the generator
Use the [watch] flag to watch the files' system for edits and rebuild as necessary.
flutter packages pub run build_runner watch
if you want the generator to run one time and exit, use
flutter packages pub run build_runner build
Add the generated route to your routes list
@AutoRouterConfig(replaceInRouteName: 'Screen,Route')
class AppRouter extends $AppRouter {

 @override
 final List<AutoRoute> routes = [
   //HomeScreen is generated as HomeRoute because
   //of the replaceInRouteName property
   AutoRoute(HomeRoute.page),
  ]
}
Finalize the setup
after you run the generator your router class will be generated, hook it up with MaterialApp.
// assuing this is the root widget of your App
class App extends StatelessWidget {
  // make sure you don't initiate your router
  // inside of the build function.
  final _appRouter = AppRouter();

  @override
  Widget build(BuildContext context){
    return MaterialApp.router(
      routerConfig: _appRouter.config(),
    );
  }
}
Generated Routes #
A PageRouteInfo object will be generated for every declared AutoRoute, These objects hold path information plus strongly-typed page arguments which are extracted from the page's default constructor. Think of them as string path segments on steroids.
class BookListRoute extends PageRouteInfo {
  const BookListRoute({List<PagerouteInfo>? children})
   : super(name, path: '/books',initialChildren: children);

  static const String name = 'BookListRoute';
  static const PageInfo<void> page = PageInfo<void>(name);
}
Navigating Between Screens #
AutoRouter offers the same known push, pop and friends methods to manipulate the pages stack using both the generated PageRouteInfo objects and paths.
// get the scoped router by calling
AutoRouter.of(context)
// or using the extension
context.router

// adds a new entry to the pages stack
router.push(const BooksListRoute())
// or by using paths
router.pushNamed('/books')

// removes last entry in stack and pushes provided route
// if last entry == provided route page will just be updated
router.replace(const BooksListRoute())
// or by using using paths
router.replaceNamed('/books')

// pops until provided route, if it already exists in stack
// else adds it to the stack (good for web Apps).
router.navigate(const BooksListRoute())
// or by using using paths
router.navigateNamed('/books')

// on Web it calls window.history.back();
// on Native it navigates you back
// to the previous location
router.navigateBack();

// adds a list of routes to the pages stack at once
router.pushAll([
   BooksListRoute(),
   BookDetailsRoute(id:1),
]);

// This's like providing a completely new stack as it rebuilds the stack
// with the list of passed routes
// entires might just update if already exist
router.replaceAll([
   LoginRoute()
]);
// pops the last page unless stack has 1 entry
context.router.pop();
// keeps poping routes until predicate is satisfied
context.router.popUntil((route) => route.name == 'HomeRoute');
// a simplifed version of the above line
context.router.popUntilRouteWithName('HomeRoute');
// keeps poping routes until route with provided path is found
context.router.popUntilRouteWithPath('/some-path');
// pops all routes down to the root
context.router.popUntilRoot();

// removes the top most page in stack even if it's the last
// remove != pop, it doesn't respect WillPopScopes it just
// removes the entry.
context.router.removeLast();

// removes any route in stack that satisfis the predicate
// this works exactly like removing items from a regualar List
// <PageRouteInfo>[...].removeWhere((r)=>)
context.router.removeWhere((route) => );

// you can also use the common helper methods from context extension to navigate
context.pushRoute(const BooksListRoute());
context.replaceRoute(const BooksListRoute());
context.navigateTo(const BooksListRoute());
context.navigateNamedTo('/books');
context.navigateBack();
context.popRoute();
Passing Arguments #
That's the fun part! AutoRoute automatically detects and handles your page arguments for you, the generated route object will deliver all the arguments your page needs including path/query params.
e.g. The following page widget will take an argument of type Book.
@RoutePage()
class BookDetailsPage extends StatelessWidget {
 const BookDetailsPage({required this.book});

  final Book book;
  ...
Note: Default values are respected. Required fields are also respected and handled properly.
The generated BookDetailsRoute will deliver the same arguments to it's corresponding page.
router.push(BookDetailsRoute(book: book));
Note: all args are generated as named parameters regardless of their original type.
Returning Results #
You can return results by either using the pop completer or by passing a callback function as an argument the same way you'd pass an object.
1 - Using the pop completer
var result = await router.push(LoginRoute());
then inside of your LoginPage pop with results
router.pop(true);
as you'd notice we did not specify the result type, we're playing with dynamic values here, which can be risky and I personally don't recommend it.
To avoid working with dynamic values we specify what type of results we expect our page to return, which is a bool value.
@RoutePage<bool>()
class LoginPage extends StatelessWidget{..}
we push and specify the type of results we're expecting
var result = await router.push<bool>(LoginRoute());
and of course we pop with the same type
router.pop<bool>(true);
2- Passing a callback function as an argument.
We only have to add a callback function as a parameter to our page constructor like follows:
@RoutePage()
class BookDetailsPage extends StatelessWidget {
 const BookDetailsRoute({this.book, required this.onRateBook});

  final Book book;
  final void Function(int) onRateBook;
  ...
The generated BookDetailsRoute will deliver the same arguments to it's corresponding page.
context.pushRoute(
      BookDetailsRoute(
          book: book,
          onRateBook: (rating) {
           // handle result
          }),
    );
if you're finishing with results make sure you call the callback function as you pop the page
onRateBook(RESULT);
context.popRoute();
Note: Default values are respected. Required fields are also respected and handled properly.
Nested Navigation #
Nested navigation means building an inner router inside of a page of another router, for example in the below diagram users page is built inside of dashboard page.

defining nested routes is as easy as populating the children field of the parent route. In the following example UsersPage , PostsPage and SettingsPage are nested children of DashboardPage.
@AutoRouterConfig(replaceInRouteName: 'Page,Route')
class AppRouter extends $AppRouter{

  @override
  final List<AutoRoute> routes = [
    AutoRoute(
      path: '/dashboard',
      page: DashboardRoute.page,
      children: [
        AutoRoute(path: 'users', page: UsersRoute.page),
        AutoRoute(path: 'posts', page: PostsRoute.page),
        AutoRoute(path: 'settings', page: SettingsRoute.page),
      ],
    ),
    AutoRoute(path: '/login', page: LoginRoute.apge)
  ],

 }
To render/build nested routes we need an AutoRouter widget that works as an outlet or a nested router-view inside of our dashboard page.
class DashboardPage extends StatelessWidget {
  @override
  Widget build(BuildContext context) {
    return Row(
      children: [
        Column(
          children: [
            NavLink(label: 'Users', destination: const UsersRoute()),
            NavLink(label: 'Posts', destination: const PostsRoute()),
            NavLink(label: 'Settings', destination: const SettingsRoute()),
          ],
        ),
        Expanded(
          // nested routes will be rendered here
          child: AutoRouter(),
        )
      ],
    );
  }
}
Note NavLink is just a button that calls router.push(destination)
Now if we navigate to /dashboard/users we will be taken to the DashboardPage and the UsersPage will be shown inside of it.
What if want to show one of the child pages at /dashboard? we can simply do that by giving the child routes an empty path '' to make initial.
   AutoRoute(
      path: '/dashboard',
      page: DashboardRoute.page,
      children: [
        AutoRoute(path: '', page: UsersRoute.page),
        AutoRoute(path: 'posts', page: PostsRoute.page),
      ],
    ),
or by using a RedirectRoute
   AutoRoute(
      path: '/dashboard',
      page: DashboardRoute.page,
      children: [
        RedirectRoute(path: '', redirectTo: 'users'),
        AutoRoute(path: 'users', page: UsersRoute.page),
        AutoRoute(path: 'posts', page: PostsRoute.page),
      ],
    ),
Things to keep in mind when implementing nested navigation #
1- Each router manages it's own pages stack.
2- Navigation actions like push, pop and friends are handled by the topmost router and bubble up if it couldn't be handled.
Tab Navigation #
If you're working with flutter mobile you're most likely to implement tabs navigation, that's why auto_route makes tabs navigation as easy and straightforward as possible.
in the previous example we used an AutoRouter widget to render nested child routes, AutoRouter is just a shortcut for AutoStackRouter, StackRouters manage a stack of pages inside of them where the active/visible page is always the one on top and you'd need to pop it to see the page beneath it.
Now we can try to implement our tabs using an AutoRouter (StackRouter) by pushing or replacing a nested route every-time the tab changes and that might work but our tabs state will be lost, not to mention the transition between tabs issue, luckily auto_route comes equipped with an AutoTabsRouter which is especially made to handle tab navigation.
AutoTabsRouter lets you switch between different routes while preserving offstage-routes state, tab routes are lazily loaded by default ( can be disabled ) and finally it allows to create whatever transition animation you want.
Let's change the previous example to use tab navigation.
Notice that we're not going to change anything in our routes declaration map, we still have a dashboard page that has three nested children, users, posts and settings.
class DashboardPage extends StatelessWidget {
  @override
  Widget build(BuildContext context) {
    return AutoTabsRouter(
    // list of your tab routes
    // routes used here must be declared as children
    // routes of /dashboard
      routes: const [
        UsersRoute(),
        PostsRoute(),
        SettingsRoute(),
      ],
      transitionBuilder: (context,child,animation)=> FadeTransition(
              opacity: animation,
              // the passed child is technically our animated selected-tab page
              child: child,
            ),
      builder: (context, child) {
        // obtain the scoped TabsRouter controller using context
        final tabsRouter = AutoTabsRouter.of(context);
        // Here we're building our Scaffold inside of AutoTabsRouter
        // to access the tabsRouter controller provided in this context
        //
        //alterntivly you could use a global key
        return Scaffold(
            body: child,
            bottomNavigationBar: BottomNavigationBar(
              currentIndex: tabsRouter.activeIndex,
              onTap: (index) {
                // here we switch between tabs
                tabsRouter.setActiveIndex(index);
              },
              items: [
                BottomNavigationBarItem(label: 'Users',...),
                BottomNavigationBarItem(label: 'Posts',...),
                BottomNavigationBarItem(label: 'Settings',...),
              ],
            ));
      },
    );
  }
}
if you think the above setup is a bit messy you could use the shipped-in AutoTabsScaffold that makes things much cleaner.
class DashboardPage extends StatelessWidget {
  @override
  Widget build(BuildContext context) {
    return AutoTabsScaffold(
      routes: const [
        UsersRoute(),
        PostsRoute(),
        SettingsRoute(),
      ],
      bottomNavigationBuilder: (_, tabsRouter) {
        return BottomNavigationBar(
          currentIndex: tabsRouter.activeIndex,
          onTap: tabsRouter.setActiveIndex,
          items: const [
            BottomNavigationBarItem(label: 'Users',...),
            BottomNavigationBarItem(label: 'Posts',...),
            BottomNavigationBarItem(label: 'Settings',...),
          ],
        );
      },
    );
  }
}
Using PageView #
Use the AutoTabsRouter.pageView constructor to implement tabs using PageView
AutoTabsRouter.pageView(
     routes: [
        BooksTab(),
        ProfileTab(),
        SettingsTab(),
        ],
     builder: (context, child, _) {
        final tabsRouter = AutoTabsRouter.of(context);
        return Scaffold(
              appBar: AppBar(
              title: Text(context.topRoute.name),
              leading: AutoLeadingButton()),
              body: child,
              bottomNavigationBar: BottomNavigationBar(
                    currentIndex: tabsRouter.activeIndex,
                    onTap: tabsRouter.setActiveIndex
                    items: [
                      BottomNavigationBarItem(label: 'Books',...),
                      BottomNavigationBarItem(label: 'Profile',...),
                      BottomNavigationBarItem(label: 'Settings',...),
                    ],
                  ),
            ),
      ); },
  );
Using TabBar #
Use the AutoTabsRouter.tabBar constructor to implement tabs using TabBar
AutoTabsRouter.tabBar(
     routes: [
        BooksTab(),
        ProfileTab(),
        SettingsTab(),
        ],
     builder: (context, child, controller) {
        final tabsRouter = AutoTabsRouter.of(context);
        return Scaffold(
              appBar: AppBar(
                 title: Text(context.topRoute.name),
                 leading: AutoLeadingButton(),
                 bottom: TabBar(
                    controller: controller,
                    tabs: const [
                    Tab(text: '1', icon: Icon(Icons.abc)),
                    Tab(text: '2', icon: Icon(Icons.abc)),
                    Tab(text: '3', icon: Icon(Icons.abc)),
                   ],),
               ),
              body: child,
              bottomNavigationBar: BottomNavigationBar(
                    currentIndex: tabsRouter.activeIndex,
                    onTap: tabsRouter.setActiveIndex
                    items: [
                      BottomNavigationBarItem(label: 'Books',...),
                      BottomNavigationBarItem(label: 'Profile',...),
                      BottomNavigationBarItem(label: 'Settings',...),
                    ],
                  ),
            ),
      ); },
  );
Finding The Right Router #
Every nested AutoRouter has its own routing controller to manage the stack inside of it and the easiest way to obtain a scoped controller is by using context.
In the previous example DashboardPage is a root level stack entry so calling AutoRouter.of(context) anywhere inside of it will get us the root routing controller.
AutoRouter widgets that are used to render nested routes, insert a new router scope into the widgets tree, so when a nested route calls for the scoped controller they will get the closest parent controller in the widgets tree not the root controller.
class Dashboard extends StatelessWidget {

  @override
  Widget build(BuildContext context) {
  // this will get us the root routing controller
    AutoRouter.of(context);
    return Scaffold(
      appBar: AppBar(title: Text('Dashboard page')),
      // this inserts a new router scope into the widgets tree
      body: AutoRouter()
    );
  }
}
Here's a simple diagram to help visualize this
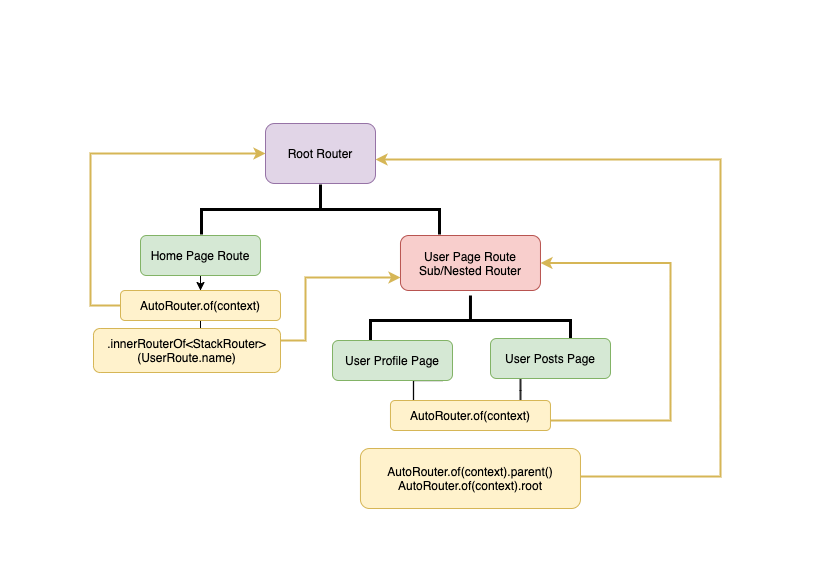
As you can tell from the above diagram it's possible to access parent routing controllers by calling router.parent<T>(), we're using a generic function because we have two different routing controllers StackRouter and TabsRouter, one of them could be the parent controller of the current router and that's why we need to specify a type.
router.parent<StackRouter>() // this returns  the parent router as a Stack Routing controller
router.parent<TabsRouter>() // this returns athe parent router as a Tabs Routing controller
on the other hand obtaining the root controller does not require type casting because it's always a StackRouter.
router.root // this returns the root router as a Stack Routing controller
You can obtain access to inner-routers from outside their scope using a global key
class DashboardPage extends StatefulWidget {
  @override
  _DashboardPageState createState() => _DashboardPageState();
}

class _DashboardPageState extends State<DashboardPage> {
  final _innerRouterKey = GlobalKey<AutoRouterState>();
  @override
  Widget build(BuildContext context) {
    return Row(
      children: [
        Column(
          children: [
            NavLink(label: 'Users',
            onTap:(){
               final router = _innerRouterKey.currentState?.controller;
               router?.push(const UsersRoute());
             }
            ),
            ...
          ],
        ),
        Expanded(
          child: AutoRouter(key: _innerRouterKey),
        )
      ],
    );
  }
}
You could also obtain access to inner-routers from outside their scope without a global key as long as they're initiated.
// assuming this's the root router
context.innerRouterOf<StackRouter>(UserRoute.name)
// or if we're usign an AutoTabsRouter inside of DashboardPage
context.innerRouterOf<TabsRouter>(UserRoute.name)
Accessing the DashboardPage inner router from the previous example.
class Dashboard extends StatelessWidget {

  @override
  Widget build(BuildContext context) {
    return Scaffold(
      appBar: AppBar(
        title: Text('Dashboard'),
        actions: [
          IconButton(
            icon: Icon(Icons.person),
            onPressed: () {
              // accessing the inner router from
              // outside the scope
              final router = context.innerRouterOf<StackRouter>(DashboardRoute.name)
              router?.push(const UsersRoute());
            },
          ),
        ],
      ),
      body: AutoRouter(), // we're trying to get access to this
    );
  }
}
Navigating Without Context #
To navigate without context you can simply assign your generated router to a global variable
// declare your route as a global vairable
final appRouter = AppRouter();

class MyApp extends StatefulWidget {

  @override
  Widget build(BuildContext context) {
    return MaterialApp.router(
       routerConfig: appRouter.config(),
      );
    }
Note: using global variable is not recommended and is considered a bad practice and most of the times you should use dependency injection instead.
Here's an example using get_it which is just a personal favorite, you can use any dependency injection package you like.
void main(){
// make sure you register it as a Singleton or a lazySingleton
  getIt.registerSingleton<AppRouter>(AppRouter());
  runApp(MyApp());
 }

class MyApp extends StatefulWidget {
  @override
  Widget build(BuildContext context) {
    final router = getIt<AppRouter>();
    return MaterialApp.router(
       routerConfig: appRouter.config(),
      );
    }
now you can access to your router anywhere inside of your App without using context.
getIt<AppRouter>().push(...);
Note: navigating without context is not recommended in nested navigation unless you use navigate instead of push and you provide a full hierarchy. e.g router.navigate(SecondRoute(children: [SubChild2Route()]))
Declarative Navigation #
To use declarative navigation with auto_route you simply use the AutoRouter.declarative constructor and return a list of routes based on state.
AutoRouter.declarative(
  routes: (handler) => [
     BookListRoute(),
     if(_selectedBook != null)
     BookDetailsRoute(id: _selectedBook.id),
 ],);
Note: the handler contains a temp-list of pending initial routes which can be read only once.
Working with Paths #
Working with paths in AutoRoute is optional because PageRouteInfo objects are matched by name unless pushed as a string using the initialDeepLink property in root delegate or pushNamed, replaceNamed navigateNamed methods.
if you don’t specify a path it’s going to be generated from the page name e.g. BookListPage will have ‘book-list-page’ as a path, if initial arg is set to true the path will be / unless it's relative then it will be an empty string ''.
When developing a web Application or a native App that requires deep-linking you'd probably need to define paths with clear memorable names, and that's done using the path argument in AutoRoute.
AutoRoute(path: '/books', page: BookListPage),
Path Parameters (dynamic segments) #
You can define a dynamic segment by prefixing it with a colon
AutoRoute(path: '/books/:id', page: BookDetailsPage),
The simplest way to extract path parameters from path and gain access to them is by annotating constructor params with @PathParam('optional-alias') with the same alias/name of the segment.
class BookDetailsPage extends StatelessWidget {
  const BookDetailsPage({@PathParam('id') this.bookId});

  final int bookId;
  ...
Now writing /books/1 in the browser will navigate you to BookDetailsPage and automatically extract the bookId argument from path and inject it to your widget.
Inherited Path Parameters
if you annotate a constructor parameter with @PathParm() and the route corresponding with the screen has no path-param with the same name but it's parent does, then that path-param is inherited and the generated route will not hold this as a parameter arg. e.g
AutoRoute(
   path: '/product/:id',
   page: ProductScreen,
   children: [
      AutoRoute(path: 'review',page: ProductReviewScreen),
  ],
),
now ProductReviewScreen expects a path-param named id but, from the above snippet we know that the route corresponding with it review has no path parameters, in that case auto_route will check if any ancestor path can provide this path-param and passes it to the child route.
@RoutePage()
class ProductReviewScreen extends StatelessWidget {
   // the path-param 'id' will be inherited and it can not be passed
   // as a route arg by user
  const ProductReviewScreen({super.key, @pathParam required String id});
}
Query Parameters #
Query parameters are accessed the same way, simply annotate the constructor parameter to hold the value of the query param with @QueryParam('optional-alias') and let AutoRoute do the rest.
you could also access path/query parameters using the scoped RouteData object.
 RouteData.of(context).pathParams;
 // or using the extension
 context.routeData.queryParams
Tip: if your parameter name is the same as the path/query parameter, you could use the const @pathParam or @queryParam and not pass a slug/alias.
@RoutePage()
class BookDetailsPage extends StatelessWidget {
  const BookDetailsPage({@pathParam this.id});

  final int id;
  ...
Redirecting Paths #
Paths can be redirected using RedirectRoute. The following setup will navigate us to /books when / is matched.
<AutoRoute> [
     RedirectRoute(path: '/', redirectTo: '/books'),
     AutoRoute(path: '/books', page: BookListRoute.page),
 ]
When redirecting initial routes the above setup can be simplified by setting the /books path as initial and auto_route will automatically generate the required redirect code for you.
<AutoRoute> [
     AutoRoute(path: '/books', page: BookListRoute.page, initial: true),
 ]
You can also redirect paths with params like follows:
<AutoRoute> [
     RedirectRoute(path: 'books/:id', redirectTo: '/books/:id/details'),
     AutoRoute(path: '/books/:id/details', page: BookDetailsRoute.page),
 ]
Note: RedirectRoutes are fully matched.
Wildcards #
auto_route supports wildcard matching to handle invalid or undefined paths.
AutoRoute(path: '*', page: UnknownRoute.page)
// it could be used with defined prefixes
AutoRoute(path: '/profile/*', page: ProfileRoute.page)
// or it could be used with RedirectRoute
RedirectRoute(path: '*', redirectTo: '/')
Note: be sure to always add your wildcards at the end of your route list because routes are matched in order.
Route Guards #
Think of route guards as middleware or interceptors, routes can not be added to the stack without going through their assigned guards, guards are useful for restricting access to certain routes.
We create a route guard by extending AutoRouteGuard from the auto_route package
and implementing our logic inside of the onNavigation method.
class AuthGuard extends AutoRouteGuard {
 @override
 void onNavigation(NavigationResolver resolver, StackRouter router) {
 // the navigation is paused until resolver.next() is called with either
 // true to resume/continue navigation or false to abort navigation
     if(authenitcated){
       // if user is authenticated we continue
        resolver.next(true);
      }else{
         // we redirect the user to our login page
         router.push(LoginRoute(onResult: (success){
                // if success == true the navigation will be resumed
                // else it will be aborted
               resolver.next(success);
          }));
         }
     }
}
Important: resolver.next() should only be called once.
The NavigationResolver object contains the guarded route which you can access by calling the property resolver.route and a list of pending routes (if there are any) accessed by calling resolver.pendingRoutes.
Now we assign our guard to the routes we want to protect.
AutoRoute(page: ProfileRoute.page, guards: [AuthGuard()]);
Wrapping Routes #
In some cases we want to wrap our screen with a parent widget usually to provide some values through context, e.g wrapping your route with a custom Theme or a Provider, to do that simply implement AutoRouteWrapper, and have wrappedRoute(context) method return (this) as the child of your wrapper widget.
@RoutePage()
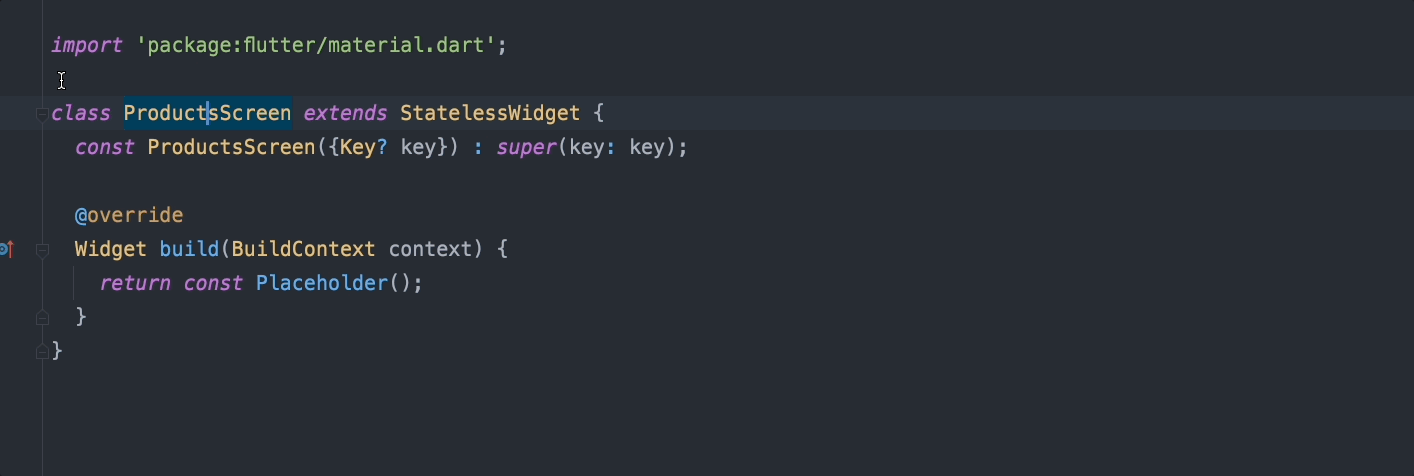
class ProductsScreen extends StatelessWidget implements AutoRouteWrapper {
@override
Widget wrappedRoute(BuildContext context) {
return Provider(create: (ctx) => ProductsBloc(), child: this);
}
...
Navigation Observers #
Navigation observers are used to observe when routes are pushed ,replaced or popped ..etc.
We implement an AutoRouter observer by extending an AutoRouterObserver which is just a NavigatorObserver with tab route support.
class MyObserver extends AutoRouterObserver {
  @override
  void didPush(Route route, Route? previousRoute) {
    print('New route pushed: ${route.settings.name}');
  }
 ...
 // only override to observer tab routes
 @override
  void didInitTabRoute(TabPageRoute route, TabPageRoute? previousRoute) {
    print('Tab route visited: ${route.name}');
  }
  @override
  void didChangeTabRoute(TabPageRoute route, TabPageRoute previousRoute) {
    print('Tab route re-visited: ${route.name}');
  }
  ...
}
Then we pass our observer to the <routerName>.config(). Important notice that navigatorObservers property is a builder function that returns a list of observes and the reason for that is a navigator observer instance can only be used by a single router, so unless you're using a one single router or you don't want your nested routers to inherit observers make sure navigatorObservers builder always returns fresh observer instances.
   return MaterialApp.router(
      routerConfig: _appRouter.config(
        navigatorObservers: () => [MyObserver()],
      ),
    );
the following approach won't work if you have nested routers unless they don't inherit the observers.
   final _observer = MyObserver();
   return MaterialApp.router(
      routerConfig: _appRouter.config(
        // this should always return new instances
        navigatorObservers: () => [_observer],
      ),
    );
Every nested router can have it's own observers and inherit it's parent's.
 AutoRouter(
    inheritNavigatorObservers: true, // true by default
    navgiatorObservers:()=> [list of observers]);

 AutoTabsRouter(
    inheritNavigatorObservers: true, // true by default
    navgiatorObservers:()=> [list of observers]);
We can also make a certain screen route aware by subscribing to an AutoRouteObserver ( Route not Router).
First we provide our AutoRouteObserver instance
   return MaterialApp.router(
      routerConfig: _appRouter.config(
        navigatorObservers: () => [AutoRouteObserver()],
      ),
    );
Next we use an AutoRouteAware mixin which is a RouteAware mixin with tab support to provided the needed listeners then subscribe to our AutoRouteObserver.
class BooksListPage extends State<BookListPage> with AutoRouteAware {
   AutoRouteObserver? _observer;

  @override
  void didChangeDependencies() {
    super.didChangeDependencies();
    // RouterScope exposes the list of provided observers
    // including inherited observers
   _observer = RouterScope.of(context).firstObserverOfType<AutoRouteObserver>();
    if (_observer != null) {
      // we subscribe to the observer by passing our
      // AutoRouteAware state and the scoped routeData
      _observer.subscribe(this, context.routeData);
    }
  }

 @override
  void dispose() {
    super.dispose();
    // don't forget to unsubscribe from the
    // observer on dispose
    _observer.unsubscribe(this);
  }

 // only override if this is a tab page
   @override
   void didInitTabRoute(TabPageRoute? previousRoute) {}

 // only override if this is a tab page
   @override
   void didChangeTabRoute(TabPageRoute previousRoute) {}

   @override
   void didPopNext() {}

   @override
   void didPushNext() {}

   @override
   void didPush() {}

   @override
   void didPop() {}
}
AutoRouteAwareStateMixin
The above code can be simplified using AutoRouteAwareStateMixin
class BooksListPage extends State<BookListPage> with AutoRouteAwareStateMixin<BookListPage> {
// only override if this is a tab page
 @override
 void didInitTabRoute(TabPageRoute? previousRoute) {}
// only override if this is a tab page
 @override
 void didChangeTabRoute(TabPageRoute previousRoute) {}

// only override if this is a stack page
 @override
 void didPopNext() {}
// only override if this is a stack page
 @override
 void didPushNext() {}
}
Customizations #
MaterialAutoRouter | CupertinoAutoRouter | AdaptiveAutoRouter
| Property | Default value | Definition |
|---|---|---|
| replaceInRouteName [String] | Page|Screen,Route | used to replace conventional words in generated route name (whatToReplacePattern,replacement) |
Custom Route Transitions #
To use custom route transitions use a CustomRoute and pass in your preferences.
The TransitionsBuilder function needs to be passed as a static/const reference that has the same signature as the TransitionsBuilder function of the PageRouteBuilder class.
CustomRoute(
page: LoginRoute.page,
//TransitionsBuilders class contains a preset of common transitions builders.
transitionsBuilder: TransitionsBuilders.slideBottom,
durationInMilliseconds: 400)
Tip override defaultRouteType in generated router to define global custom route transitions.
You can of course use your own transitionsBuilder function as long as it has the same function signature.
The function has to take in exactly a BuildContext, Animation<Double>, Animation<Double> and a child Widget and it needs to return a Widget, typically you would wrap your child with one of flutter's transition widgets as follows.
CustomRoute(page: ZoomInScreen, transitionsBuilder:
(BuildContext context, Animation<double> animation, Animation<double> secondaryAnimation, Widget child) {
 // you get an animation object and a widget
 // make your own transition
    return ScaleTransition(scale: animation, child: child);
  })
Custom Route Builder #
You can use your own custom route by passing a CustomRouteBuilder function to `CustomRoute' and implement the builder function the same way we did with the TransitionsBuilder function,
the most important part here is passing the page argument to our custom route.
CustomRoute(page: CustomPage, customRouteBuilder:
 (BuildContext context, Widget child, CustomPage<T> page){
     return PageRouteBuilder(
     fullscreenDialog: page.fullscreenDialog,
     // this is important
     settings: page,
     pageBuilder: (,__,___) => child);
} )
Others #
AutoLeadingButton-BackButton #
AutoLeadingButton is AutoRoute's replacement to the default BackButton to handle nested or parent stack popping.
to use it simply assign it to the leading property inside of AppBar
appBar: AppBar(
  title: Text(context.topRoute.name),
  leading: AutoLeadingButton(),
)
ActiveGuardObserver #
ActiveGuardObserver can notify you when a guard is being checked and what guard it is, it can be used to implement loading indicator for example.
var isLoading = false;
 void initState(){
    final guardObserver = context.router.activeGuardObserver;

    guardObserver.addListener(() {
      setState((){
        isLoading = guardObserver.guardInProgress;
       });
    });
  }
Remove shadow from nested routers #
This fixes the issue referenced here
https://stackoverflow.com/questions/53457772/why-there-is-a-shadow-between-nested-navigator
https://stackoverflow.com/questions/68986632/rid-of-elevation-of-nested-flutter-navigator-2-0
MaterialApp.router(
  theme: ThemeData.dark().copyWith(
  pageTransitionsTheme: PageTransitionsTheme(
     builders: {
         // replace default CupertinoPageTransitionsBuilder with this
        TargetPlatform.iOS: NoShadowCupertinoPageTransitionsBuilder(),
        TargetPlatform.android: FadeUpwardsPageTransitionsBuilder(),
    } )
  ),
Note: CupertinoRoute already uses this fix, so no need to override PageTransitionsTheme
Migrating to v6.0 #
In version 6.0 auto_route aims for less generated code for more flexibility and less generation time.
Note You can use AutoRoute-helper plugin for Android studio to help you migrate to v6.0

1- Instead of using MaterialAutoRouter,CupertinoAutoRouter ...etc we now only have one annotation for our router which is @AutoRouterConfig() and instead of passing our routes list to the annotation we now pass it to the overridable getter routes inside of the generated router class and for the default route type you can override defaultRouteType
Before
// @CupertinoAutoRouter
// @AdaptiveAutoRouter
// @CustomAutoRouter
@MaterialAutoRouter(
routes: <AutoRoute>[
  /// routes go here
   ],
)
class $AppRouter {}
After
@AutoRouterConfig()
class AppRouter extends $AppRouter {

@override
RouteType get defaultRouteType => RouteType.material(); //.cupertino, .adaptive ..etc

 @override
 final List<AutoRoute> routes = [
  /// routes go here
  ]
}
---2- Passing page components as types is changed, now you'd annotation the target page with @RoutePage() annotation and pass the generated result.page to AutoRoute();
Before
class ProductDetailsPage extends StatelessWidget {...}
AutoRoute(page: ProductDetailsPage) // as Type
After
@RoutePage() // Add this annotation to your routable pages
class ProductDetailsPage extends StatelessWidget {...}
AutoRoute(page: ProductDetailsRoute.page) // ProductDetailsRoute is generated
--- 3- EmptyRoutePage no longer exists, instead you will now make your own empty pages by extending the AutoRouter widget
Before
AutoRoute(page: EmptyRoutePage,name: 'ProductsRouter') // as Type
After
@RoutePage(name: 'ProductsRouter')
class ProductsRouterPage extends AutoRouter {}
AutoRoute(page: ProductsRouter.page)
---4- Passing route guards is also changed now, instead of passing guards as types you now pass instances.
Before
AutoRoute(page: ProfilePage, guards:[AuthGuard]) // as Type
After
AutoRoute(page: ProfilePage, guards:[AuthGuard(<params>)]) // as Instance
5- "initial" flag is removed now, use "/" for initial routes or empty path "" for nested-initial routes .
Before
AutoRoute(page: HomeScreen, initial: true)
After
AutoRoute(page: HomeScreen, path: '/')
Examples #
coming soon
Support auto_route #
You can support auto_route by liking it on Pub and staring it on Github, sharing ideas on how we can enhance a certain functionality or by reporting any problems you encounter and of course buying a couple coffees will help speed up the development process.
Metadata
Publisher
Metadata
AutoRoute is a declarative routing solution, where everything needed for navigation is automatically generated for you.
Repository (GitHub)
View/report issues
License
![]() unknown (LICENSE)
unknown (LICENSE)
Dependencies
collection, flutter, meta, mockito, path